Essential Tools and Materials for Burn Hole Repair
How to fix a burn hole in a car seat? Repairing a burn hole in a car seat at home is achievable when you have the right tools and materials. This section of our guide will help you gather everything you need before you begin the repair process.
Gathering Your Repair Kit Tools
To fix a burn hole in your car seat, you’ll need the following items:
- Scissors for cutting fabric and mesh.
- A razor blade to remove damaged material.
- Sandpaper of various grits to smooth edges.
- Cotton swabs for detail work.
- A repair kit that’s appropriate for your seat material.
- A heat gun or hairdryer to activate adhesives.
- Rubbing alcohol to clean the area.
- Optional dye or paint that matches your seat color.
Make a list and gather these items before you start. It helps to ensure the repair process goes smoothly without interruptions.
Choosing the Right Materials for Your Car Seat
Choosing the right repair materials is critical for a good match with your car seat. Leather seats require a leather repair kit, while vinyl seats need a vinyl repair kit. Use fabric that closely resembles the texture and color of your car seat.
For a successful, unnoticeable repair job, take some time to find the best match. Check the repair kit’s contents and ensure it includes a colorant if your seat has a unique shade. If the damage is extensive, more specialized materials like a mesh backing or specific adhesives may be necessary.
Remember, the better the material match, the more seamless the repair will look. Use your scissors and razor blade carefully to prepare the materials, following the instructions provided in the repair kit. And always work in a well-ventilated area to ensure your safety when using heat tools and adhesives.
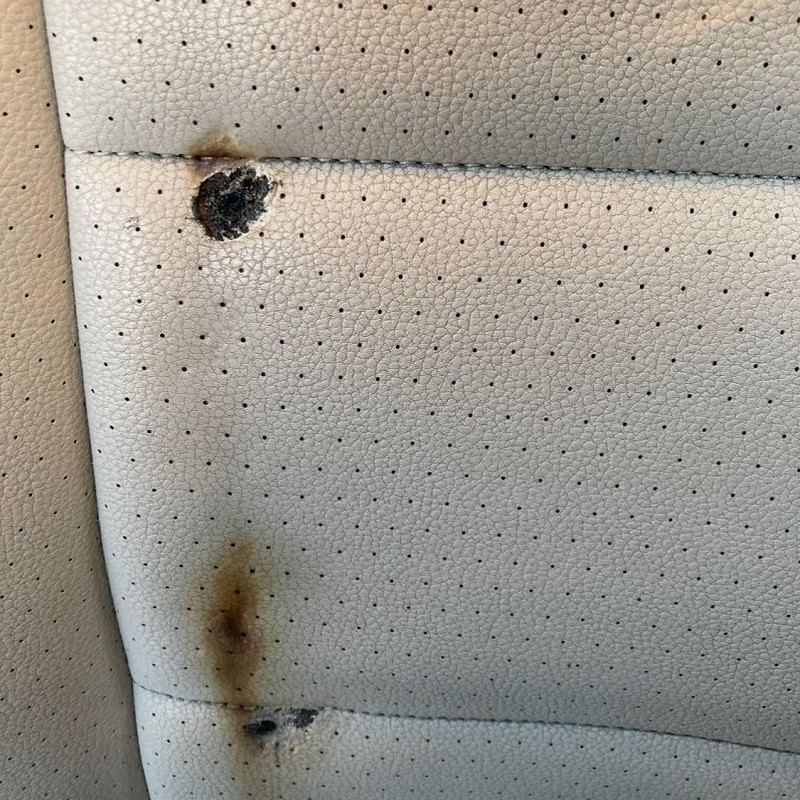
Assessing the Burn Hole Damage

Before you tackle the repair, it’s vital to assess the damage the burn hole has caused. Take a close look and evaluate how big and deep the burn is. This initial step is crucial as it determines the course of action for the repair process and whether a DIY fix is possible or professional help is needed.
Identifying the Severity of the Burn Hole
Start by measuring the burn hole’s size. If it’s larger than a quarter inch, the damage might be too extensive for a simple repair. Check the depth too; shallow burns are easier to handle. Pay special attention to the hole edges; frayed or melted edges can signal more serious damage.
Make sure there’s no additional damage beyond what’s initially visible. Look for singeing or discoloration that might indicate heat has affected more of the seat than just where the hole is.
Pre-Clean and Prepare the Affected Area
Once you’ve sized up the damage, it’s time to prep the area for repair. Begin by cleaning; a tidy surface ensures better adhesion for repair materials. Use rubbing alcohol to wipe around the hole, removing dirt and oils. Allow it to dry completely.
This cleanliness is key; any grime left behind can weaken the bond between the seat material and the repair patch. After cleaning, you’ll also have a clearer picture of the hole’s true size and shape, which is crucial for the next steps in the repair process. Now, you’re ready to move forward with confidence.
Removing the Damaged Area
Once you have evaluated the extent of the burn hole, it’s time to remove the damaged section. This step is pivotal for ensuring a clean and secure base for the repair material.
Trimming and Sanding the Burn Hole
Begin by gently trimming away any charred or dangling material from the edges of the burn hole with scissors or a razor blade. Be careful not to extend the damage. After trimming, smooth the edges with a piece of 180-grit sandpaper. This helps create a level surface that blends with the rest of the seat material.
Preparing for the Repair Process
Following the removal and sanding, test the repair material. Cut a small piece to ensure it fits well into the hole. The goal here is to have a seamless match that doesn’t bulge or recede from the seat’s level. Also, prepare your workspace. Lay out your tools, so everything is at hand. Ensuring a dust-free environment will aid in the adhesive process.
Repair Material Application
Now that you have prepared the area around the burn hole and have your tools ready, the next stage involves applying the repair material. This phase is critical as it dictates the durability and appearance of the repair. Let’s move on to how to fix a burn hole in a car seat by attaching the patch and activating the repair compound.
Cutting and Attaching the Fabric Patch
After choosing the right material for your car seat, cut a fabric patch that will cover the burn hole adequately. The patch should be slightly larger than the hole to ensure a secure fit. Now, apply a thin layer of fabric glue to the edge of the hole. Place your patch over the hole and press it into place, ensuring that it adheres well to the seat and has no wrinkles or bubbles. Let the patch dry, which might take a few minutes, depending on the glue used.
Activating the Heat-Compound
If your repair kit includes a heat-activated compound, it’s now time to use it. Position the compound material over the patch and apply heat. A heat gun or hairdryer can be used for this purpose. Keep the heat source moving to avoid overheating any area, which might damage the seat further. The heat activates the compound, creating a bond that integrates the patch into the seat material. Once it’s bonded, allow the repair to cool down before you proceed to the next steps.
By following these steps, the repair material will be securely attached to the car seat, making the hole disappear into the rest of the seat’s fabric. Remember to work with care and patience to ensure the best results.
Smoothing and Refinishing the Repair

After the burn hole repair material is firmly in place, it’s time to make it look seamless with the rest of the car seat. This part of the repair is crucial for aesthetic reasons, ensuring that the repair is not only strong but also nearly invisible.
Sanding the Repaired Area
To start smoothing, use 600-grit sandpaper on the dried repair patch. Gently sand in a circular motion, blending the patch with the surrounding seat material. Take care not to sand too aggressively to avoid further damage. The goal here is to make the repair smooth, so it feels like the rest of the seat.
With the surface evened out, run your fingers over the repair. It should feel as smooth as the rest of your car seat. If rough spots remain, continue sanding lightly until you achieve the desired smoothness.
Applying Dye or Paint for Color Matching
Sometimes, the repair material’s color might not match perfectly with your car seat. In such cases, dye or paint is needed to blend the repair into the car interior. Use a small brush or cotton swab to apply dye or paint, matching the seat material’s color to your car seat.
Apply colorant sparingly, building up the color in layers for a perfect match. Allow the dye or paint to dry thoroughly between applications. This process takes patience, but the result will be a repair that’s almost undetectable.
By completing these steps with care and precision, the burn hole in your car seat will become just a memory. It’s now ready for the final touches to ensure longevity and comfort.
Finalizing the Repair
Once you’ve smoothed and color-matched the repaired area, you’re in the homestretch. Finalizing the repair ensures that it blends well with your car seat and lasts longer.
Conditioning and Protecting the Repaired Area
After the dye or paint has dried, apply a leather or vinyl conditioner. This keeps the material supple and helps prevent future cracks or tears. Pick one that’s suited for your car’s upholstery and apply with a clean cloth. It’s a simple but vital step to shield the repair from wear and tear.
Aftercare Tips to Maintain the Repair
Here are some quick aftercare tips:
- Avoid placing sharp items on the seat to prevent new punctures.
- Clean spills immediately to prevent staining or further damage.
- Regularly condition your seats to maintain their resilience.
Following these tips can help your repair last and keep your seat looking its best.
By adhering to these steps and using the keywords ‘how to fix a burn hole in a car seat’, you not only restore your car seat effectively but also protect it for future use. Remember, patience is the key to a successful DIY repair project. Your car seat repair should now be flawless, resilient and well-integrated into the rest of the upholstery.
Preventing Future Burn Holes
After successfully fixing a burn hole, preventing future damage is crucial. Simple habits and protective measures can safeguard your car seats against additional burns.
Tips on Avoidance and Protective Measures
To avoid the hassle of repairing another burn hole in your car seat, consider these tips:
- If you smoke, do so with caution in your vehicle. Use an ashtray to catch any ashes or embers.
- Never hold cigarettes or other hot objects close to the seats. Keep them at a safe distance.
- For non-smokers, be mindful of passengers who might smoke. Offer them an ashtray and remind them to be careful.
- Install seat covers. They protect the original material from burns and are easy to replace if damaged.
- Avoid placing heated electronics or items that may become hot directly on your car seats.
- Park in the shade when possible. This prevents the interior from getting too hot, which can increase the risk of damage from hot items.
By following these preventative steps, you can maintain the appearance and integrity of your car’s interior. It’s much easier to prevent a burn hole than it is to fix one, so be proactive in protecting your seats from potential harm.
When to Seek Professional Help
Sometimes, a burn hole may be too big or complex for a DIY fix. Knowing when you need professional help can save you time and prevent further damage to your car seat.
Understanding When DIY Repairs Aren’t Enough
There are certain times when attempting to fix a burn hole yourself might not be the best option. Consider seeking professional help if:
- The burn hole is larger than a quarter inch.
- The burn has made a deep impact on the seat cushion.
- The seat’s material is rare or expensive, like some leathers.
- You can’t find a matching repair kit for your car seat’s color and texture.
- You tried a DIY repair, and the hole is still noticeable or getting worse.
In these cases, professionals have the tools, skills, and materials to restore your seat like new.
Finding a Reliable Repair Service
Finding the right professional for the job is crucial. Look for repair services with good reviews and expertise in car upholstery. Get a few quotes and check their past work, if possible. Make sure they specialize in repairing burns in car seats and ask them what methods they use. Before you choose, confirm the cost and time needed to fix the burn hole.
With the right professional, your car seat will look great and last longer. Remember, while DIY repairs can be satisfying and cost-effective, some situations call for expert attention. Don’t hesitate to reach out to professionals when needed.